
A gift for participants at the NC Quilt Symposium, these chicken pincushions are really easy and fun to make. For those that were not able to attend, you can download the instructions and make one from your favorite scraps of fabric, just click on the following link – Chicken Pincushions from CMLA
Here’s a quick overview of how they are done.
Chicken Pin Cushions
Materials:
2 squares of fabric 4 ½” each (body)
Fabric squares for tail (3-1/2”), beak (about 1-1/2”), and comb (as big as you like) (fold each 2x diagonally)
Beads or buttons for eyes
Scraps of fusible batting or batting and a scrap of fusible web
Directions: Please read ALL directions before starting.
- Place one 4.5” square right side up. Working with the right (or left) top corner…place one comb, on the top edge, facing inward and at least ¼” from the corner. Be sure it is facing inward. Pin in place.

- Place your beak triangle which is a twice, folded square (size is your choice) in the same upper right corner, but this time it goes on the RIGHT (or left) edge, at least ¼” from the corner. Pin in place.
- Place the second 4.5” square right side down on top of the first square.

- Sew across the “comb” edge and also sew the entire “beak” edge.
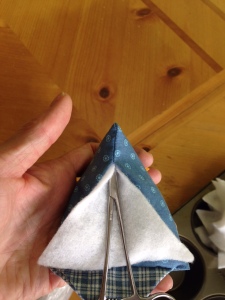
- Working on the edge directly across from the comb… sew from each corner toward the center, leaving a generous opening for filling later.
- REFOLD the only remaining seam so it goes perpendicular to the rest of the seams you have already sewn, meeting the seams in the center. BEFORE sewing completely shut, INSERT the tail. Be sure it is facing inward. Pin in place, and sew the entire seam.

- Turn your completed chicken right side out. Isn’t she cute!?
- We recommend that you insert scrap stuffing, or batting (cotton ball size) up into the peak of your chicken’s head.
- Continue to sew on buttons, beads, or make French knots for the eyes (easy to hide your knots inside the head at this point).

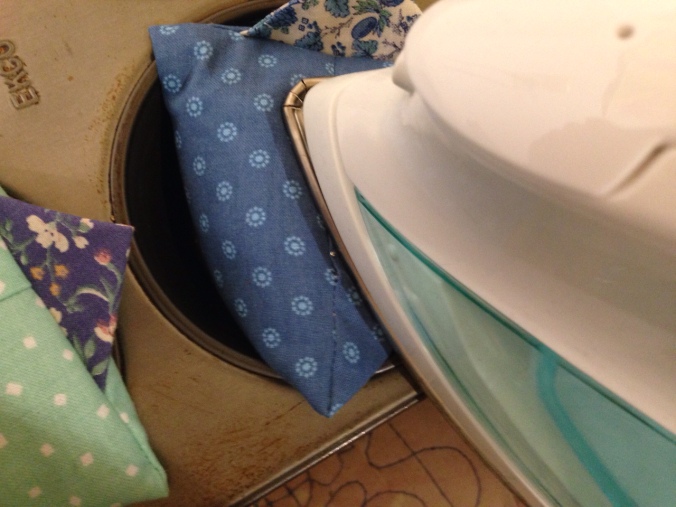
- Fill with ground walnut shells. (better than rice or beans because of critters).

- Insert your scrap of fusible batting/batting and a scrap of fusible between the walnut shells and the seam you are about to close.
- Overlap the seam (keeping one side folded and neat) and pin in place.

- Fuse the seam shut with your iron.
- Whip stitch the seam you just fused for insurance that it won’t open with use.


The members of the Carolina Mountain Longarm Association hope you enjoy your pincushion, and please see our member pages when you are looking for your next quilt to be quilted. Thank you!


I love the picture of the ‘Crazy Chicken Ladies’…you all are fantastic!!
LikeLike
Thank you so much for the chickens you made for the Symposium, they were a huge hit and much appreciated! What happy surprises I saw on faces when they pulled the chickens out of their tote bags.
Mary Anne
LikeLike
I attended the Randolph Quilters Guild Quilt Show on Saturday, November 14th, and I received one of your Chicken Pin Cushions as a door prize. I am tickled to death! It will always be right next to my sewing machine for all to see! Thank you for your donation to the Guild and making my day at the quilt show extra-special. I love that you have shared the pattern. I might just have to make some of these for friends and family. Mary Jo Reed; Fincastle, VA
LikeLike